From Idea to Product making art come to life

title

Hello Everyone!

I am so excited about this post. I love to draw, always have, probably always will.  I have never formally taken a class or had any sort of training so I have always been shy with my art. Recently I have decided to just start drawing and putting it out into the world.

For Christmas my fantastic parents bought me a whole bunch of different types of Sharpies!!!! I love sharpies. They are fantastic to work with. If you missed my free Valentines Day Cards Downloadable post you can check it out here: https://goo.gl/hhBvOB

I used all sharpies to make the valentines day cards.

So I thought it would be a fun idea to make my mom and dad a thank you picture using all the cool markers they bought me for Christmas.

Here it is getting started:

10 wm


Getting Colored in:

7 wm

Almost Done:

9 wm

Done:

10 wm


I liked it! So I took a really high resolution photo of it, and had it made into real Thank You Cards!

Here is how they turned out!

11 wm

I also decided that they would make awesome Thank You coupon cards for my etsy store.

I am super happy with them.

4 wm

13wm

The Thank You Cards are available on my Sugar Beet Crafts Etsy Store Here: https://www.etsy.com/listing/268470697/set-of-3-thank-you-so-much-flower

If you love to doodle or draw or take pictures, don’t be afraid to take your art to the next level. It is really fun and easy to do.

Have you been inspired to draw lately? I would love to see it, feel free to post a link in comments.

Cereal Box Makeover #3 – Cereal Box into Notebook in 30 minutes or less

Hi Everybody!
I hope you are having a great week so far!
So we are on week #3 of Cereal Box Crafts.

If you missed Project #1 Cereal box to postcard you can find it here: https://goo.gl/F2CuK4

If you missed Project #2 Cereal box to bookmarks and dividers, you can find it here: https://goo.gl/brvJgG

This project was really fun and only took 30 minutes to complete. This would be great for kids or anyone who likes to DIY their supplies.

This is a great back to school craft!

I had a bunch of loose graph paper just sitting in a drawer….for like years! So I decided to use it in this project in the hope that I would use it. And you know what…I think I will. I really like this project a whole bunch. It is also a great excuse to gather all those loose pages and turn them into something useful.

So here we go!

Cereal Box into Notebook

Gathering your supplies:

Corner Punch
Duct Tape or Washi Tape
Scissors
Hole Punch
Cereal Box
String
Loose Paper

1

Make sure you find a box that will be large enough for the paper you choose to use.

Steps:
1. With box still intact, undo the flaps from the top and bottom of the box, so that      you can lay it flat.

Take the left side of the long side of the cereal box and fold it down the center,      Bringing the side of the front and back of the box together.

2
2.  Keep the side of the box with the folded edge together, then cut off the top and     bottom flaps and the remaining unfolded side. Discard extra pieces.

3

Now if you open up the main piece you have a front, back and the folded side.

4


3.  Keep the folded side folded and cut off about ½ inch or so from the bend. You are      going to sandwich the paper between the two left over pieces, so make sure piece      you are leaving attached is large enough for the hole punch.

5

At this point you should have the front and back of the box with a tiny folded edge along the inside of both.

6

7

4.  Line your paper between the two folded edges and mark where the holes of the           paper are. If you are using paper with no holes. You will want to hole punch your       paper first, then line up the paper with your cereal box.

8

5. Once your holes are marked, make your punches. They need to be on both the           front and back cover little flaps.

9

6.  Now grab some string or twine or even ribbon, and we are going to string               everything together. I started with the back flap first. I strung one end of the       twine in the top hole and one in the very bottom.

10

Add the string through the corresponding hole in the paper, then go out through the flaps of the top.

11

7.  You should have two strings coming out from back, take both those strings, put         them together and string them through the middle hole together. Once the strings       are on the back side, pull tight.

12

8.  Repeat one more time. Take the strings that are now in the middle hole, separate       and string one through the top and one through the bottom holes back through to     the front. Then once in the front, gather both and string them back through the         center hole.

13

9.  Now all strings should be in the back. Pull Tight.
Knot both sides of the string to the existing string.

14

15
10.  Then I knotted them together and cut off the excess.

16

17

Opened up.

10.  Now when you close it, It has a raw edge with the side of the pages sort of            sticking out. To make it look more neat, I used duct tape and covered the side.      You can also used washi tape, I just happened to have duct tape on hand.

18

19

20

11.  For the final touch, I used a corner rounder to round the corners of the cereal           box. Completely optional.

21

22

And you’re done! Woo hoo Cereal Box notebook. Bonus, it has a game on the back!

You can always take this a step further and use Mod Podge to cover it with paper or fabric. Or use gesso to make a white background and you can decorate it all yourself.

I personally like the box showing. It would be super cute with different boxes.

I hope you all like this one! Let me know how yours come out or what you think.

Have a wonderful weekend, Happy Crafting!


Cereal Box Crafts! #2 Bookmarks and Organizer Dividers!

There is nothing more tragic than the tons of trash we go through as a human race. So it is nice to find things to repurpose and upcycle. Finding things to do with things has become an obsession.

If you missed last weeks post on turning cereal boxes into postcards you can find it here: https://goo.gl/LTxRR5

This week, while doing some research on my things to do with cereal box posts, I decided to show you just a couple super simple and quick things you can do with cereal boxes or food boxes that you can use in your office or school supplies.

In school or work or well just life you can never have too many bookmarks or dividers!

I have no idea what it is like to be a kid these days, but in my day…in school, I was always jealous of the kids that had rad supplies that were totally original. Sure it is nice to get new stuff but there is nothing like something you made yourself, that no one else has. Even if it is as simple as a bookmark.

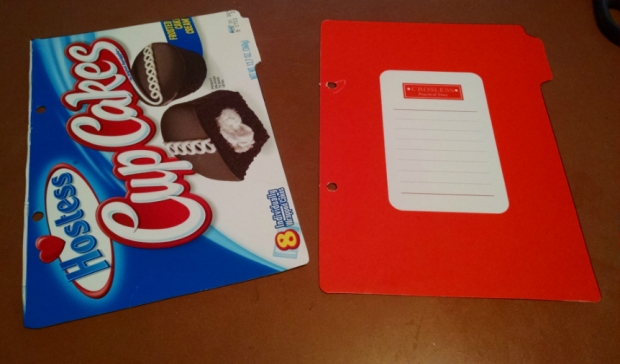
This one is so easy, cut out the picture side of boxes to your favorite foods, punch a hole at the top and add some string! And there you go. I used a fancy scissor and cut the top and bottom, just to add a little something extra…and there you go. A delicious distraction.

Bookmark!Mmm Sweet Knowledge...Here is another way to fancy up a food box bookmark.

Yum! Scalloped Potatoes box!  The side of the box was the perfect size for a bookmark, So I grabbed some fabric washi tape that is a bit wider than normal and cut out side of the box.

Fabric Washi Tape Bookmark

I measured the size of the bookmark and cut out the same amount of washi tape. I covered both sides, so cut two equal pieces of washi tape.

Then carefully apply the washi tape to the cut out box piece.measure

Once that is complete, Grab a hole punch and some ribbon or string.

Punch a hole in the top middle and loop through your string.6

There you go a pretty little bookmark. What a great gift!TaDa!

Ok lets move on to the super quick organizer divider!

I use a small divider to keep all my ideas and such. Because I am an over organizer and use a ton of divider tabs, unfortunately you only get so many with the pack, and sometimes if you have an organizer like mine, it is hard to find the right size divider.

So I make my own!

You need one of your current divider pages, a box that is big enough to fit the divider page, scissors, and a hole punch.

Box Organizer Divider

Use a marker to trace the outline of your current divider page to your cut out box.
9

Then carefully cut out.

10

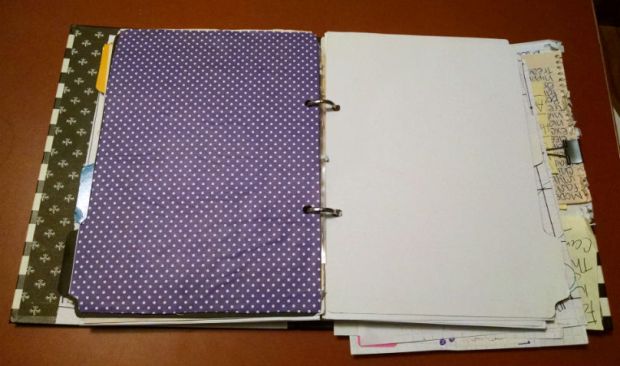
Cover your made page with the original page to mark where the holes go. Mark with a pen, then punch out your holes and add to your organizer.

11

If you want to get fancy you can use Mod Podge (or glue) and paper to cover the new divider page.

I used scrapbook paper here:
*Cover your newly cut out divider page with a light layer of glue. Then press down on your paper.Let Dry.
*Once dry, cut out the divider page and punch your holes.

12


These are just a few super simple things you can do with food boxes. You never know what supplies you need in a pinch, or when you need a quick distraction project for a kid..or for yourself 😀

Have a great weekend everyone!!


Composition Notebook Cover Re-Do #1 (Decoupaged Paper Mix Media Style)

title

Tutorial by Sugar Beet Crafts

Composition Notebook Cover Re-Do #1 (Decoupaged Paper Mix Media Style)

Hi Everybody!

It’s tutorial time! I love to customize my own office supplies. I use composition notebooks for everything so keeping them easily identifiable is a must. I am going to create a few tutorials over the next few weeks showing you different ways to maximize the fantasticness of your notebook, so keep an eye out!

This week I thought I would start with a fun one. Its basically paper mixed media. I use these techniques when I make tags and art journal entries. I had fun with it and really like how it turned out. I hope you like it too.

So here we go!

Materials Needed:

  • Composition Notebook
  • Mod Podge
  • Ink Spray or Watercolors
  • Paper cut outs or Stickers
  • Embroidery Thread
  • Beads
  • Markers
  • Glitter Glue
  • File Folder
  • Scissors

First off, let’s make a reusable template. Now of course you do not have to do this step, you can just trace around your composition book. I personally like a template, easier to handle.

I use file folders, they are the perfect thickness and I usually have a whole bunch of extras around. *You could also use a cereal box, they also work great.

Place the folded edge of the composition book along the folded edge of the file folder.

I like to make templates I can re-use.

I like to make templates I can re-use.

Trace. Cut out.

cut out template

I always keep the scraps for later. You never know when you need a random piece

The bendable line farthest from the folded edge of the folder is the same amount of space the black tape on the composition notebook. This comes in handy if you are not going to cover the entire book and want to keep the black tape on the notebook exposed.

4

I usually bend it over then trace on that line to get the right size.

folded

Now the fun stuff.

You can use anything you like as a background. For the tutorial I decided to use 2 pages that were photocopied out of a vintage dictionary. One for the front and one for the back.

copied page of vintage dictionary

Gather your materials:

Gather your template and your background page.

Gather your template and your background page.

Trace the template onto the background image.

Then cut out.

Cut out your Background page

Gather your ink sprays or watercolors, Spray with color!

I used Dylusions Ink Spray, but you could use watercolors or anything you like.

 Dylusions Spray

I colored up the page by spraying  Ink Sprays around the page.

Then I added some water to get the colors to run together and combine.

Let completely dry.

I used Ink spray and water

I used Ink spray and water

  1. Once the spray is completely dry, Open the composition book so that it’s flat.
  2. Make sure your finished background fits the top of the composition book the way you like.
  3. Smear the cover page of your composition book with Mod Podge then stick the background in place. I add a layer of Mod Podge, then lay the page on top, then carefully smooth it out.
  4. Repeat with the back page on the back of the composition book.
  5. Let completely dry. The drying time is the hardest part.
  6. Once everything is dry, it’s time to start adding the fun stuff. Gather all your cutouts or stickers or whatever you would like to stick to your composition book.

Arrange your cutouts, once you’re happy use the Mod Podge to stick them down.

Stick down cutouts

Now Carefully cover everything with the Mod Podge. The Mod Podge will pick up the color of the ink even after drying, so I usually pour some out into a container rather than re-dipping the brush in the main container.

11

Sticker for the back
Back

Front Cover Dried

Let completely dry.

You can now cover with a spray clear sealer if you want too. I like to use it. Keeps things nice.

Now, You can stop here… but I didn’t.

I like to add bookmarks. And random stuff.

Usually, I just tape a ribbon to the inside of the front or back cover as a bookmark, but I decided to have a little fun with this one.  

I had some left over tags that I previously decorated.

  1. I placed them side by side and taped just the outside side on each tag. So they open towards each other.
  2. I then strung some embroidery string through the Tags hole, and added a pretty little bead to the bottom, just for pizzaz.
I used pen to add some detail to the leaves

I used pen to add some detail to the leaves

Flaps

Bookmarks & Beads

Here is a link to some earlier Mixed Media tag projects, you might like some ideas to use for your Composition book covers. https://goo.gl/CdvZcc

I would love to see what you come up with! Send me some pics!

Next week I will be doing Composition Notebook cover RE-Do #2! You will have to check it out to see what it is.

Have a wonderful week everyone! Let’s get crafting!

Before & After

5 Sites with Amazing Recycling Projects


Recycling Projects

Hola Everyone! I am recovering from a nightmare migraine so this is just a quick post.

I am all about reusing trash as you know, and I came across some sites that made my jaw drop! Some of these upcycling ideas are just wonderful. I want to give all these people a hug, weird I know, but some people are just so crazy creative! I love it! 

Here are 5 sites with amazing recycling ideas to help get you motivated to upcycle not just recycle:

1.)  Sophia at http://mygreatchallenge.blogspot.com/ created an awesome DIY colored pencil organizeer using recycled materials around the house. I love this project, I am totally going to make one. Check it out here: My Great Challenge – DIY Colored Pencil Organizer

2.)  Diane at Crafty Pod, shows us how to How to make a gift box from an old greeting card! This is such a great idea. Check it out here:  Crafty Pod- How to Make a Gift Box from an Old Greeting Card

3.)  I absolutely love this idea, and can not wait to try it out. It comes from Jessica Jones at How About Orange.blogspot.com.  How to Make Gift Bags from Newspaper! How About Orange – How to Make Gift Bags from Old Newspapers

4.)  Check out this cool recycled gift canister, wrapping, and fabulous bow by Bptakoma on instructibles.com You will find it here: Instructables.com – Cool Recycled Gift Canisters

5.)  Beauty Harmony Life has some of the most creative ideas for recycling items. I absolutely love the wine and beer bottle coffee tables! Oh and the DIY Owls! 25 Diy Ideas to Recycle your potential Garbage. Check it out! Beauty Harmony Life – 25 DIY Ideas to Recycle your Garbage

Enjoy!

Happy Recycling!


Rescued Toilet Paper Rolls!

Rescued Toilet Paper Rolls!

As you know, I Love Love LOVE to reuse trash! I know that sounds so weird. I just hate to waste resources. Especially something I can use to craft with. Everything is so expensive these days. I never pass up on a freebie, and I try to make anything myself I can.

So this is how the project came about….I am obsessed with pens, markers, highlighters, and pencils.

It is a serious ailment I’ll tell you ( my boyfriend would tell you too 😀 ) so anyway, I love pen displays in stationery stores. You know the ones I am talking about, You turn the corner and there brightly lit and perfectly organized rows of bright colors. Markers, Pens, Pencils, felt tip, ballpoint, extra fine point, on and on and on. Too many possibilities! It was the part of the craft and stationery stores that gave me goosebumps. Luckily I have a cool mom (that also has this pen illness) and I often came home with a new color pen. Hmmm, Perhaps she was a pen-enabler… a  Penabler!

Back to the project! So as someone who is very visual I hated my pen drawer, it sort of looks like my makeup drawer. It was so sad, just a jumble of lonely pens, all points, types and styles mixed together. Not very conducive for a creative atmosphere…well for my head anyway. So I went from a big ole mess of pens everywhere…

To This!

Image

Now I just want to play with all of them!

I just started to gather paper towel rolls (they can be cut to size)  and tp rolls.

Just pack them all together. If they are not staying where you want them too just use either a hot glue gun or you can use regular glue or Mod Podge, secure the rolls together with paper clips to keep them close while the glue dries.

If you want to get really fancy, decorate them with paint or washi tape or scrapbook paper.

I also have an obsession with anything vintage. My grandma just gave me her old make up case, and I could

not stand the thought of it sitting in a closet. I liked it so much I did the same thing with my mess of paint brushes.

I found this vintage case cheap in a Goodwill.

Image


So many options, so little time!

I hope you have a wonderful Day! How do you organize your supplies? I would love to know!